NEW PRODUCTS
Panasonic’s AG-DVX100,
[In images below,
to see larger version of chart, image or graphic, move cursor over area you
wish to expand and click.]
|
While the ASC strives to make its website as accessible as possible, the content here is many years old and online for archival and historical reasons. Unlike the rest of our website, it's not feasible to make it completely accessible. Please email us at webeditor@ascmag.com with any questions about this content, and for the latest American Cinematographer content, please visit ascmag.com.
NEW PRODUCTS
Panasonic’s AG-DVX100,
[In images below, to see larger version of chart, image or graphic, move cursor over area you wish to expand and click.]
24p in the Palm of Your Hand
by Jon Fauer, ASC
Every once in a while, a breakthrough camera comes along: Debrie Sept, Aaton A-Minima, Panaflex Millennium XL and Arricam Lite. The recurrent themes that get me excited are light weight, small size and great versatility. One of the latest entries for that list is the Panasonic AG-DVX100.
Panasonic got almost everything right with this 4.4-pound MiniDV camcorder. It’s great for low- and no-budget productions that are shot in 24p DV but hope for a blow-up to 35mm for theatrical projection. The camera excels in standard 60i video as well, making it suitable for documentaries, sports and educational and corporate video. It is also ideal for film schools because of its low-cost ability to simulate 24-fps filming that is easy to edit in Avid’s Xpress DV or Apple’s Final Cut Pro.
But as good as the DVX100 is, it’s not time to put your film cameras up for sale on eBay. The many compelling reasons to continue shooting film are still aesthetics, economics, archival ability, slow motion, exposure latitude, color and contrast. You also might share the paradoxical belief that the world’s best MiniDV camera is the Aaton A-Minima (similar size, shoot film, transfer to tape).
The trade-show buzz was loud last year when Panasonic unveiled a prototype of the DVX100. The company promised AC one for this review, but the production models sold out before any demo units could be made available. So when Michael Phillips of Avid called to say that he already had one, I couldn’t wait any longer. (You can usually count on me to buy almost any new piece of technology before the factory seal is dry.) Peter Abel of Abel Cine Tech sold me the last one on the planet before Christmas, although they’re more readily available by now.
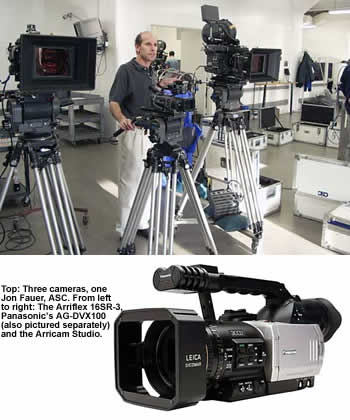
The Panasonic AG-DVX100 camera and Kodak’s new Vision2 5218/7218 film stocks came out around the same time. We wanted to see how the camera lived up to its buzz, how it compared to film, and how each format compared as a 35mm release print projected at Technicolor. On a cold day in December, Michael Phillips, Pete Fasciano, Howard Phillips, Charlie Tammaro, Tibor Sands, Sean Strong, John Buckley, Janet Duran, Phil Gosiewski and I met at Camera Service Center in New York to do a little testing. We lined up the Panasonic DVX100 next to an Arriflex 16SR-3 and an Arricam Studio.
We shot lots of tests, color charts, gray scales, interior and exterior scenes at CSC. In order to even the post playing field, all footage was handled in the digital environment. The film was processed at Moving Images, coordinated by Domenic Rom, and transferred on a Spirit by Milan Boncich at Tape House Digital Film as 2K DPX data files. No grain management was done at time of capture. The DVX100 material was digitized via SDI into an Avid Symphony Universal at 24p native. The frames were color-corrected using the Avid Symphony and then exported as sequential uncompressed TIFF files for the “up-rez” process to 2K. Next, Tim Spitzer at Tape House organized assembly of the DV tape and the film data files.
Another test we did was use a desktop-based application to up-rez some of the DVX100 footage. The TIFF files were brought into S-Spline(www.s-spline.com) and 2K files were created. (The next version of S-Spline will allow for sequential files to be done as a series rather than one by one to speed up this process.)
Once all the files were at 2K, they were output to Kodak 5242 fine-grain negative by Christian Zak on an Arrilaser at 2K resolution. The film was processed, printed onto Kodak Vision 2383 and screened at Technicolor NY. The 2K digital video footage and the filmed-out footage were viewed for the different distribution channels available for programming — theatrical 35mm, HD and NTSC/PAL broadcast — with resolutions of 2K, 1080p and 480. Knowing what each of these looks like is key to choosing the right storytelling medium for the distribution channel desired. In some cases, all of them are needed; a theatrical release, for example, has 35mm, NTSC broadcast and DVD/video market requirements.
We were all amazed by how good the DVX100 footage looked. The images were very sharp — not quite as sharp as 16mm, but still very crisp. Color was good. Exposure range was about the same as most video — about eight stops from shadow to highlights. On the Spirit, contrast of the 16mm 7218 could be stretched to about 11 stops, and the 35mm 5218 greater than 13 stops, especially in the highlights. The DV footage was very clean, with very little noise or artifacts. The 16mm footage looked grainier, although we could have eliminated grain by using Scream in the telecine process. The bottom line is that you can make very nice blowups from the Panasonic DVX100.
Ideally, the DVX100 would have native 16:9 CCD chips for theatrical blowups, because 4:3 blowups are rare. The best work-around would be an anamorphic adapter from Panasonic or Century Optics. We didn’t test this because the devices weren’t available at the time. I don’t recommend changing the camera’s menu setting (Aspect Conv: Norm or Letterbox) from the native 4:3 format (Norm) to a “forced” 16:9 electronic setting (Letterbox). Letterbox on this camera, and most other native 4:3-chip cameras, means you’re not using all of the chips’ pixels; the camera is essentially masking off the top and bottom of the chips with electronic “black paper tape.”
What’s so great about the DVX100? Price and size. It costs less than a Segway people mover (list price about $3,795). It’s about the size and shape of a beer mug on its side, handle on top. The 3.5" LCD screen is bright, even outdoors. It can be folded flat against the body, display facing out, for critical follow focus by a camera assistant. Focus marks cannot be placed directly on the lens barrel and are not repeatable. Like many lower-cost lenses in the digital world, it seems to use contrast circuitry to know when it’s in focus. For repeatable marks, your assistant has to watch the LCD screen and use a numbering system of 0-99. The camera has three 1/3" CCDs, each with 410,000 pixels. Shooting in any of the progressive modes allows the full vertical resolution to be captured for 480 lines in NTSC (720x480), which is what makes it so interesting for film output.
One of the best things about this camcorder is its viewfinder. It’s huge — Panaflex- or Arricam-sized — with a rubber eyecup that accepts a real film-style eyepiece chamois to help prevent fogging. Its sharp, bright color image is better than any other camera this size, and good enough to focus on most scenes. The eyepiece has a diopter adjustment and swivels up 90° for low-angle shots.
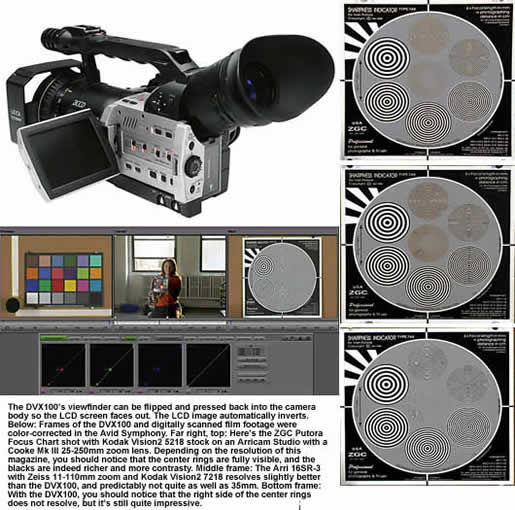
Panasonic’s Leica lens is extremely sharp. The 4.5-45mm f1.6 Leica lens has a 10:1 zoom range, with an equivalent angle of view that translates to 32.5-325mm in 35mm still-photography format; 25-250mm for those of us who think in 35mm motion-picture format; or approximately 12-120mm for 16mm film format. We shot tests with a ZGC Putora chart (available from www.zgc.com) and compared it to a Cooke MK III zoom in 35mm and a Zeiss 11-110mm zoom in 16mm.
The lens has knurled rubber rings for manual zoom and focus. There’s a slide switch at the front to disengage the servo zoom. You can manually focus even if the camera is in Autofocus; as soon as you turn the focus ring, you’re focusing manually. Clearly, the designers were looking at photos of vintage 16mm zooms: the useless vestigial zoom lever is still there, crying out to be unscrewed and discarded. But the electric zoom is quite smooth, with nicely feathered starts and stops when you press on the rocker switch. Get an accessory external StealthDVX zoom control from Panasonic (www.panasonic.com) or Varizoom (www.varizoom.com) to clip onto the tripod handle.
The see-through from behind sunshade is clever: it doesn’t block your other eye’s field of view, and it protects against some lens flares. But it should be made of hard rubber, and it should fold back. Be careful of flares. Because this is a wide zoom, and because the three 1/3" CCD chips offer huge depth of field, any flares on the front element will clearly illuminate any dust or smudges there. Keep the front element very clean.
The camera’s right side has the typical hand strap, two XLR audio inputs and FireWire/IEEE 1394, video and audio outputs. I used the camera in –20°F temperatures in Stowe, Vermont. It worked better than I did.
The knurled dial at the rear of the camera selects the shooting mode: normal 60i video, 30p or 24p. Before you demand a refund from your dealer, be aware that the camera makes a strange, clunking noise inside the lens assembly when it’s turned off. This is normal. Another quirk is that in 24p mode, Autofocus and Gain are disabled. Furthermore, the viewfinder and LCD image in 24p looks jittery, possibly because of the circuitry, but is much better when played back on a monitor.
If you’re just getting into shooting 24p, shooting some motion tests would help you get used to acceptable panning speeds. Most of the rules for strobing when shooting 24-fps film apply: generally, you’re safe from strobing if an object takes five or more seconds to move across the entire screen. Practice and reviewing the tape on a good monitor will pay off. 24p has a motion blur like film shot at 24 fps that has been transferred on telecine and played back on an NTSC monitor.
The manual iris displays the actual f-stop in the finder. The “effective” ASA of the camera is around 320 ASA. (The spec sheet says F11 at 2000Lux.) In 24p mode, we found that the picture looked better if we underexposed from about a half-stop to a stop. For example, in our tests, Janet Duran of CSC sat in front of a window, wearing a black skirt and holding a Macbeth chart. The key side of her daylight-Kino-Flo-lit face was f5.6. The sky in the camera-left window was reading f64 (six stops overexposed). Her skirt was f1.4 (four stops under).
On the 35mm negative (picture at left), all of the picture information is there — over 11 stops of range. In the same scene, shot with the DVX100, most of the window burns out to white. The scene looks a little overexposed — had we stopped down another half-stop or even a full stop, we would have retained more highlight detail, and the camera’s ability to see into the shadows would have been more pleasing. Colors appear more saturated.
Cost comparisons are difficult and dangerous — there are almost as many parameters as there are different kinds of equipment, labs, post houses and productions. But here are some ballpark budgets:
Let’s say you’re planning a low-budget DV feature. You can buy the camera, accessories and tape stock for less than $5,000. Your up-front costs are minimal. The expenses add up in post, when your masterpiece is ready to be submitted to a film festival that only accepts film. Color-correcting a feature shot in DV could take up to 24 hours at $700 per hour, and “printing” to film with an Arrilaser could cost $550 per minute. Even without titles and effects, you might easily spend $71,800 on just getting through the color correction and the film recording. Add another $8,200 for titles and effects, for a total of $80,000. (Remember, your mileage and cost may vary.)
That’s about the same price ($80,000) as buying 40,000' of 16mm raw stock, processing it and doing an optical blowup to 35mm.
· 100 x 400' foot rolls of raw stock @ $140 per roll = $14,000
· 40,000' x $0.14 per foot for processing = $5,600
· Video dailies = $18,000
· 35mm Optical Blowup with titles & opticals = $43,000A digital intermediate (the way to go) can add another 20 to 50 percent.
Shooting in 35mm isn’t all that much more expensive — $50,000 buys the raw stock, and processing and post will add another $40,000.
I might teach a cinematography course at Columbia University this summer, and I have recommended the DVX100 as the camera to use. We’ll see lots of independent films and network documentaries shot with it this year. One thing is certain: designers are busy dreaming up the sequel and the competition to this camera.
Jon Fauer, ASC is a director and director of photography, as well as the author of many books on cinematography, including Arricam Book (ASC Press) and Shooting Digital Video.
Using the Panasonic AG-DVX100, Technically Speaking
by Michael PhillipsThe Panasonic AG-DVX100 camera has been causing quite a stir in the independent-filmmaking community since its release in early October 2002. Much like any other DV format, questions arise: “Is it as good as film?” “Does it even look like film?”
Well, what we perceive as film has many visual cues, and frame rate, raster, gamma, depth of field, luminance range and grain all play a part in these questions.
The Setup
Part of the process is to understand the capabilities of the camera via its settings. The DVX100 offers more image control than any other camera in this price range. Two of the key elements in approaching the film look are frame rate and raster. The fact that the camera can capture motion at 24 fps progressively meets two of the many cues mentioned above — frame rate and raster. Beyond that are the options for different gamma responses, as well as setting the black level via a master pedestal setting.
Howard Phillips, Peter Fasciano and I spent many hours monitoring a waveform/vectorsope while taking the camera through each of its settings to get a sense of its capabilities in preparation for the film/DV test. We first noticed that one of the options, “Cine Gamma,” is something of a misnomer in the sense that it isn’t a film look for video capture. This setting is used when you know that the captured images are going back to film. The film will then impose its own “look” on the images in terms of detail in the whites and black ranges of the luminance scale. Instead of allowing a “curve” or “shoulder” to be introduced to the highlights, the Cine Gamma mode is a straight-line response all the way out to about 110 IRE. The other settings allow some “shoulder” control starting around 90 IRE and cut off at 100 IRE. Because of this, we recommend underexposing (stopping lens down) by about 1 stop for the Cine Gamma mode to allow more highlight detail to be captured. All of this is expected to be manipulated and corrected later during the post process for a film output.
A very nice feature of the camera is a spot meter that can be turned on in place of the normal “zebra” functionality. The range of the spot meter is from 0 percent (black) to 90 percent (white). It is unfortunate that the range is not 100+ percent for white, but overall, this readout works well for all ranges below that for a digital version of the “zone” system. In our test of the spot meter’s response, we found that the pixels contained within the center boxed-in area for the spot meter are averaged to provide the numeric readout. This means that you must zoom in to fill the entire sampling area (within the center brackets) with the portion of the image that you want to measure.
At the other end of the scale, managing the black level is another creative choice. There are two ways to change the black level of the camera, and each interacts with the other. One is the “Set Up” and the other is the “Master Pedestal.” The Master Pedestal test was accomplished by shooting with the lens cap on across the full range offered in the Master Pedestal. The test was done twice, once with Set Up at 0 and once at 7.5. The material was then captured as a baseband DV stream from a Panasonic DVCPro deck via SDI into an Avid Symphony to check both the RGB level of the signal and its IRE equivalent on a waveform/vectorscope. (See attached grid.) We found that a good starting point has the Set Up at 7.5 and Master Pedestal set to –8. From that, we get a nice relationship of: Spot Meter = 0 percent; RGB = 16 (digital black for NTSC video); IRE = 7.5 (proper IRE level for 16 RGB set up in NTSC analog world).
A similar relationship can be achieved with Set Up at 0 and Master Pedestal at -6. We also noticed that the difference between the two Set Ups was not the expected 7.5 IRE shift, but closer to only 2-2.5 IRE. We also noticed that, regardless of setting, the camera never achieved 0 RGB black in capture. The sensors shut down to a hard clip at about 3 points on the RGB scale and remain there. (Reference the chart again.)
Understanding the black-level control enables more accurate creative control over depth of shadow detail. By raising the Master Pedestal to a point higher than -8 (in the 7.5 set up scenario), all the shadow detail is captured with no inadvertent clipping of black levels in the video signal. This may lead to the first impression that the camera creates lower contrast or milky-looking images, but this conservative black setting allows for more options and manipulation in post, where the user can set the black level to any desired point to create the “look” he is after, as well as legal NTSC signals.
The rest of the controls are subjective, as are the creative choices such as detail level (sharpness/softness), chroma level (saturation), etc. Chroma Phase is difficult to properly set without a waveform/vectorscope and the proper set of charts. On our camera, Chroma Phase is set to -4 in order to line up the burst to the chroma phase on a scope.
Camera Modus Operandi
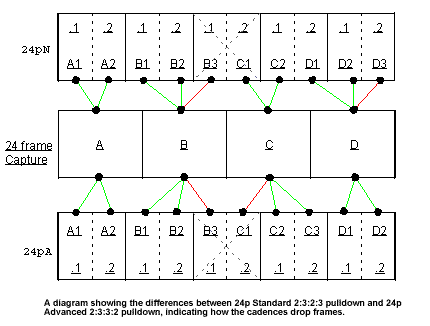
The camera has four shooting modes: 30 fps interlace (30i), 30 fps progressive (30p), 24 fps progressive with Normal pulldown (24pN) and 24 fps progressive with Advanced pulldown (24pA). We use the term 24p for ease of use, the actual frame rate is 23.976.
The 30 fps modes are pretty straightforward, but the two types of pulldown can cause some confusion for first-time users. I want to make it clear that both types of pulldown can go back to film with absolutely no difference in quality. To use Panasonic’s terms, there are 24p and Advanced. For the sake of this article, I will use the terms "Standard" for traditional pulldown with the 2:3:2:3 cadence (F5 setting on camera) and "Advanced" for new pulldown with the 2:3:3:2 cadence (F6 setting on camera).
The confusion seems to stem from the fact that in order to go back to film, the user must use the Advanced pulldown mode. This is not true. Choosing Standard or Advanced is a decision based on the editing application used in post. If the application used is capable of creating 24-frame progressive from the NTSC signal, then either type of pulldown can be output to film.
The reason for the Advanced pulldown mode (F6 setting) is to allow native DV editing applications the ability to create 24p from the NTSC signal. This is because of the amount of time it takes to convert the fields of the "C" frame (see diagram) to create a new progressive frame. The C frame within a Standard pulldown cadence is comprised of two fields but from two different frames (starting with field 2 and then field 1). To make a progressive frame from this type of pulldown requires that the field order be flopped, and then a progressive frame created. Another issue with doing this over FireWire and native DV is the recompression that is needed in order create this type of frame.
The chart shows the two types of pulldown from a 24-frame capture. The middle row is the original four frames, representing 1/6 of a second (the pattern repeats itself six times every second). The top row is a Standard pulldown cadence and the fields that are captured are represented with green arrows. The bottom row is the Advanced pulldown cadence. Current hardware capture card systems such as Avid and AJA Kona that work from an NTSC signal and have the ability to inverse telecine in real time expect to see the standard pulldown cadence.
The Advanced cadence allows a native DV signal over FireWire to just "drop" the C frame in order to recreate the original 24p capture. There are applications that can post-process the captured DV media and create the 24 progressive frames. DV Film Maker (www.dvfilm.com/maker/dvx100.htm) is currently the only post processing software that works with the "advanced pulldown" without decompressing and recompressing the frames. It is available for both Mac and Windows platforms. There are also applications that allow real-time inverse telecine during capture such as Blade 2 from In-Sync. Both Avid and Apple have announced support for this format during capture in upcoming releases.
Something to be considered is whether the footage will be edited at native 24p. If not, and the footage is going to be integrated into existing 30i footage, or if there will be a mix of film and 24p DV, then you will want to shoot with the Standard pulldown to give the motion a consistent look. The use of Advanced pulldown almost dictates the use of inverse telecine or frame removal because the cadence is a bit easier for the eye to detect. The two long frames (three fields) are in sequential order, creating more of a bump to the motion than with Standard pulldown, where the long frames are spread out between the short frames. When outputting to NTSC for broadcast or when encoding MPEG2 from an NTSC output, you will want to make sure the render or the playback is done with Standard pulldown.
Here are some basic rules for shooting:
Shoot Standard pulldown when: 1.) You’ll be mixing with 30i or other film-originated footage, or 2.) You’ll be capturing as 1:1 NTSC (24p) for final color correction, etc. (Avid or other SDI based capture boards, etc.).
Shoot Advanced pulldown when using native DV editing application with capture over FireWire (capture may need to be processed depending on the editing application being used).
Regardless of which pulldown is used for capture, as long as the editing application can recreate the original 24 progressive frames, the output can easily go to film, NTSC and PAL.
Michael Phillips is principal product designer at Avid Technology and owner of www.24p.com.
.