
THE LAST SAMURAI • page 2 • page 3 LORD OF THE RINGS • page 2 • SIDEBAR |
 |
 |
 |
 |
 |
 |
 |
 |
 |
Page
3
|
||
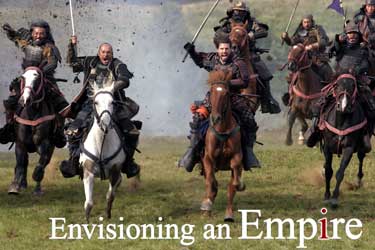
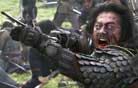
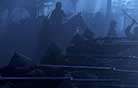
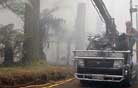
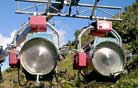
The battle scene that introduces the samurai is quite striking. How did its design come about? Toll: We wanted to create a sense of mystery and suspense in this sequence because at this point in the story, the audience has not yet seen the samurai and they have only been referred to as a threat. The scene was written to have the samurai come galloping out of the fog, and we struggled with how to do this. While scouting in New Zealand, it became obvious very quickly that a bright, sunny day there did not easily lend itself to creating a believable foggy morning. We also wanted a setting that wouldn't duplicate the setting of the final battle, which takes place on an open field. So we tried to find a forested area that was open enough for horses to gallop through, but heavy enough to give us a mood of mystery and provide cover from sunlight. We eventually found a forested area that was actually a tree-harvesting enterprise operated by the local government. It looked pristine and original, but we were able to do trimming and cutting as necessary because the trees were all going to be harvested. Art director Jess Gonchor did a great job of shaping it exactly to our needs. The biggest challenge in shooting this sequence was maintaining continuity in the light and in the levels of smoke used for the fog effect. We shot the scene for two weeks, and the weather and lighting conditions were constantly changing. At times the sun would streak through the trees, and at certain angles it looked quite dramatic coming through the smoke, but it was impossible to get off more than a couple of takes before the shadows and sunlight changed drastically. Also, because it's an action scene, we needed to shoot many different angles, and it was impossible to shoot anything in direct frontal or even cross sunlight in the smoke because it looked ridiculous. We needed to be able to completely control the light in some areas of the set, but the UFO was impractical because of the trees and because the frame was actually too small. Mick suggested hanging blacks in the trees to keep the sun from hitting an area of the set. We initially thought a couple of 20-by frames would do, but I think we eventually hung eight 20-by-20 blacks on pipes end to end to create the areas of shadow we needed. We hung them vertically from pulleys and could set them up just out of shot. It was like having a 20-by-160-foot black teaser to block the sunlight. The blacks went up and came down very quickly, and we just used that same section of forest for everything. Maintaining continuity in the smoke was a nightmare, because some days were perfectly still and others were windy. Special-effects man Stan Blackwell supervised the smoke team, and he did a great job. Trying to control smoke in windy conditions has got to be one of the most frustrating situations we encounter, and it's made worse when we're trying to match something shot on a calm day. Everyone on the set seems to have an opinion on how to do it better than the person doing it, and in spite of all of the help and advice I was eager to give Stan, he kept his sense of humor and pulled us through it. But even with that, we had some serious matching problems, and this is one of the scenes I'm finishing digitally. The ability to alter contrast and match color in a DI will help enormously in fixing some of the continuity problems. This was the last scene we shot in New Zealand, and by that time of year, the sun was much lower in the sky. That and the overhead blacks meant I needed as much exposure as possible, so I shot 5218 without 85 and rated it at 400 ISO. When I needed more exposure, I force-developed it one stop. It worked very well, and I saw very little difference between the normal and force-processed 5218. How did you approach filming the climactic showdown between the Japanese army and the samurai? Toll: All of the battles were storyboarded, and our shooting schedule for them was based on the boards. The schedule was laid out by Kevin De La Noy, our production manager for New Zealand, and Nilo Otero, our first AD. Kevin organized all of the support for the battles. He dealt with the thousands of production details inherent in this type of work, and also supervised the construction of the base camps and the roads needed for access to the sets. It was a massive job that he performed flawlessly. The complexity of the battles required a second unit and a visual-effects unit to work alongside the first unit. Given the time-consuming nature of the work with the horses and the coordination of the explosions and stunts in the final charge, this sequence was a classic second-unit situation that could be shot while the first unit was filming other parts of the battle. I recommended director/cinematographer Gary Capo be the person to shoot it. I had worked with him on Wind and The Thin Red Line (AC Feb. '99) and knew he was a great choice. Gary's second unit worked on the horse charges in both the final battle and the fog battle, as well as many details in both of those sequences. Also, there were about 150 effects shots planned for the picture, many of them in the battles, and Jeff Okun worked with New Zealand director of photography John Mahaffie on shooting the various plates and elements he would need for that work. Jeff eventually created twice the number of effects shots we originally anticipated, all of them very impressive and mostly invisible as effects because they blend perfectly with the naturalistic style of the rest of the film. Both Gary and John made huge contributions to Last Samurai, and we were fortunate to have them. Throughout the battles, I also had two extra camera crews working on first unit, operators Darrin Keough and Cal McFarlane, and operator Leigh McKenzie worked with Gary on the second unit. While doing storyboards in prep, Ed and I discussed various ways to shoot the horse charge. We planned on doing both tracking and stationary shots, and I wanted to use longer focal-length lenses for both. This required a stabilized remote head for shooting the tracking shots from an insert car. I had heard good things about the Wescam XR remote head, and I was familiar with the Libra head, so I shot a test during prep and decided to use both. When Gary arrived in New Zealand, we had both remote heads, along with Wescam tech Steve Rogers and Libra tech John Bonnin. Gary's unit worked with a full-sized insert car from Auckland that had two crane arms mounted on it; one was a Giraffe with a Pan-Arri 435 mounted on the Wescam, and the other was an arm David Nichols had built with a Pan-Arri 435 mounted on the Libra head. Both cameras worked with 11:1 [48-550mm] anamorphic zooms, and both the Wescam and the Libra heads worked extremely well. One reason for the long lenses on the tracking shots was to shoot close-ups of the principal actors riding in the horse charge. For safety reasons, the horses couldn't work close to the crane arms, and even though they would be running parallel to the car, they would be galloping in an open field, so their distance from the camera was likely to be irregular. I was hoping to use focal lengths of at least 250-350mm on these shots, and as it turned out, we were commonly working at 550mm on one camera and in the 200-400mm range on the other. It became pretty obvious that shooting the scene this way was going to be very challenging for the first ACs/focus pullers. During prep, I was discussing this issue with various people at Panavision, including my first AC, Chris Toll, and another AC who happened to be there, Baird Steptoe. Baird told us about a prototype range-finding device that Moe Shore, a designer from Panavision, was developing to work in conjunction with the Smart Lens system. Essentially, this rangefinder, the Panatape Long Range, uses infrared laser to measure subject distance out to a distance of several hundred yards. It performs this function 100 times per second and within an accuracy of two inches. The subject-distance information is fed to a Smart Lens display on the camera, where both the subject distance and the lens focus distance can be seen as witness marks. When the focus puller keeps the two witness marks aligned, the subject stays in focus. An important part of this system is making sure that the infrared is targeted on the subject you want to be in focus; this is done through a viewfinder built into the unit. When Chris and I first saw the Long Range, it was in an early stage of development. We asked to do some tests, and Phil Radin was happy to oblige. We suggested several changes, all of which Moe adopted from our ideas. We took two of these units when we started shooting, and Chris and Tommy Klines used them periodically and made minor alterations, but they were used mostly in the battles. By that time, Tommy had the idea of adapting the infrared viewfinder system so it would be visible on a separate video monitor, and this made the unit much more practical to use. Gary's first AC, Mike Fauntleroy, used it with great success; he was working on an insert car at the long end of the 11:1, most of the time at 550mm, and he found the unit very reliable. All of the ACs agreed that using the Long Range took a little getting used to, but it was well worth it.
Page
3
|
||